Braided hairstyles are an absolute classic for a good reason - they're super easy to do yourself at home, they always look amazing, and you can rock different braided styles for any occasion, whether it's a casual day out or a fancy event.
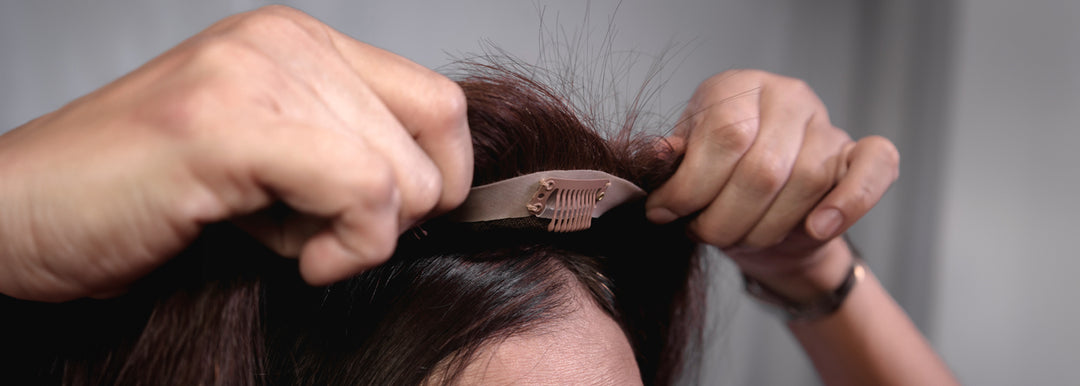
Now, if you're rocking some fabulous hair extensions, you might be wondering, "Can I still braid my hair even with the extensions in?" The answer is a definite yes! Just because you have extensions doesn't mean you have to miss out on all the beautiful braided hairstyles out there.
In this guide, I'll walk you through everything you need to know about braiding your extensions into your hair and styling them so they look completely natural and seamless. Let's get started!
Key Takeaways
-
You need a few special tools to braid hair extensions properly - an extension brush, hair clips, combs, elastics, and two mirrors.
-
Prepping your hair before braiding is really important - wash, condition, oil your scalp, and stretch/part your hair first.
-
For short extensions, stick to basic 3-strand braids, French/Dutch braids, or fishtail braids. Incorporate the extension pieces as you go.
-
Secure braids without tools by creating a double braid, back-combing the ends, or wrapping a hair tie with a small section left out.
-
Take good care of your braids - don't braid too tight, wash carefully, wrap in silk at night, use leave-in conditioner, and get roots touched up.
Material You Need for Braiding Hair
You will need 5 important things to braid hair extensions properly:
-
A special brush made just for hair extensions. This brush from Wet Brush is loved by hair professionals and hair enthusiasts alike. It gently detangles wet or dry hair of any texture, including wigs and hair extensions. Plus, you get a free scrunchie with your purchase to keep your hair out of your face while brushing.
-
Combs for parting the hair into sections. These combs help create neat parts.
-
Hair clips or grips. These hold the hair sections in place while you braid.
-
Elastics or a hair tie. You use these to secure the braids once finished.
-
Two mirrors. One mirror to see the front, and another to see the back of your head. This helps you braid evenly.
Prepping Your Hair Extensions
Braids help protect your hair from damage. But you need to prepare your hair properly to get the full benefits. Here are 4 tips:
-
Thoroughly Clean Your Hair and Scalp: Before braiding, wash your hair very well. Never braid dirty or wet hair. Use a clarifying shampoo to remove all dirt and buildup. Clean hair helps braids last longer. Shampooing also feels nice when you massage your scalp.
-
Condition Your Hair: After shampooing, always condition your hair. Conditioner adds moisture back into your hair that the shampoo removed. This prevents breakage and dryness.
-
Oil Your Scalp: Washing and conditioning alone isn't enough to lock in moisture. You need to use a hair oil to seal in the moisture. Oils don't moisturize directly, but they seal the moisture from your conditioner. Use an oil with ingredients like sunflower, avocado, or castor oil.
-
Stretch or Part Your Hair: If adding extensions, blow dry your hair straight first. Stretching makes it easier to braid the extensions in. If braiding without extensions, part your hair into sections first. Parting makes braiding much simpler.n
Braiding Techniques for Short Extensions
Braiding with short extensions can be a bit tricky, but it's totally doable with a few adjustments.
Basic 3-Strand Braid:
This is an easy braid for beginners. To add short extensions, first section your hair and use a product to help keep it smooth. Then take a piece of extension hair, fold it in half to make a loop at the end. Hold a small piece of your own hair next to the loop. Start braiding, adding in the loop. As you keep braiding, keep folding over little pieces of the extension and adding them in. When it's long enough, use a hair tie or bobby pins at the end.
French/Dutch Braids:
These braids make your hair look bigger and poofier on top. To add extensions, start a regular 3-strand braid at your hairline using your own hair. After a few stitches, fold over an extension piece and braid it in just like your hair. For French braids, weave new hair under the braid. For Dutch braids, weave new hair over the braid in the middle section. Keep braiding this way, adding in the extension when you need more length. Tie off at the end.
Fishtail Braids:
These braids make a cool zig-zag pattern. First, part your hair and use the product. Split hair into two sections. Take an extension piece, and fold it in half. Hold a piece of hair from the side section next to the folded end and braid them together. Now start fishtail braiding - take a strand from one section and cross it under the other section. Then take a strand from that side and cross it under. Keep going, adding in little folded pieces of the extension whenever you need more length from that side. Braid all the way down and tie off.
Tips: Use good extensions that match your hair. If your hair is super short, look into crochet or invisible braids that start with extensions. Practice on a head-first before your own hair. Look online for video tutorials on braiding short extensions. When sealing the braid with synthetic hair, use hot water.
How to Secure the Braids
Update your braiding techniques with these three solutions:
-
Create a double braid without any tools. Only separate hair at the base when sectioning into three strands. The bottom section will automatically braid itself as you braid the top. Flip the bottom braid through when done.
-
Use a teasing comb to back-comb and mat together the three strands at the end of a thin braid for a secure, dreadlock-like finish. Avoid thick braids.
-
The easiest closure - leave out a small section of hair before securing the braid with an elastic. Wrap that section around the elastic, then wrap a small piece of the elastic around that wrapped hair.
Tips for Long-Lasting Braided Styles
-
Don't braid too tightly - it causes damage and unraveling
-
Consider getting intricate braids done professionally for longevity
-
Wash scalp every 1-2 weeks, use a light oil to moisturize
-
Wrap braids in satin/silk at night to prevent frizz
-
Minimize playing with braids to avoid loosening
-
Use a leave-in conditioner spray to keep braids hydrated
-
Smooth flyaways with a small amount of hair oil
-
Get roots retouched as your hair grows out
-
Remove braids after 6-8 weeks and deep condition hair
")
")
")
")
")
")
")
")
")
")
")
")
")
")
")
")
How to Remove Braided Extensions Safely
Go slowly and gently undo each braid from the ends up, using a tail comb or fingers to detangle the extensions from your hair. Spritz braids with a conditioning product first to help lubricate and ease removal. Work in sections to prevent tangling. Re-moisturize very dry or matted extensions with water or conditioner before unbraiding if needed. See a stylist for severely tangled extensions. Expect some shedding after removal until your natural hair recovers. Deep condition and be gentle.
Braid Hair Styles
-
Fishtail Braid: This intricate braid looks impressive but is surprisingly easy to achieve in short or long hair. Blend in hair extensions to create a thicker, longer fishtail braid that cascades down your back.
-
Box Braids: Protective and stylish, box braids are a popular choice that resembles Senegalese twists. Use hair extensions to create longer, fuller box braids that last for weeks.
-
Dutch Braid: For a unique twist, try a Dutch braid. Start with a few face-framing pieces and incorporate hair extensions as you braid, creating a voluminous, intricate look.
-
French Braid: Classic and chic, a French braid is an excellent way to showcase hair extensions. Braid tightly from the crown, gradually adding in extensions for a seamless blend.
-
Mermaid Braid: This trendy style combines a French braid at the crown transitioning into a fishtail, with extensions woven in for added length and mermaid-like waves.
-
Feed-In Braids: Have braids installed around your head that feed into an updo like a ponytail or bun at the back, using extensions for thickness and length.
-
Waterfall Twist: This looks like an intricate waterfall braid but is achieved by twisting sections and weaving them together, made fuller with extensions.
-
Crown Braid: Hair is braided in a circular crown shape around the head. Extensions provide length and volume for a striking look.
-
Formal Braided Bun: Elegant for events, this style involves braiding sections and pinning them into an updo bun, enhanced with extensions.
-
Half-Up Braids: Face-framing braids in a half-up, half-down style with extensions blended in for dimensional texture and protective style.
-
Pigtail Braids: Children's classic gets a grown-up twist - two long braids on each side of the head made thicker with extensions.
-
Braided Ponytail: A simple three-strand braid or fishtail on a ponytail, using extensions to create an enviable length.
-
Cornrow Braids: Extensions allow for fuller, longer cornrow styles that can be parted different ways on natural hair.
-
Messy Textured Braids: Braids with a lived-in, piecey look thanks to extensions providing more hair to work with.
-
Stacked Braids: Two or more braids stacked on top of each other, intertwined. Extensions give enough length for this dimensional style.
-
Headband Braids: Dainty braids worn like a headband around the hairline, made possible with seamless extensions blended in.
-
Goddess locs: Extensions are crocheted to the natural hair to create a similar, long-lasting lock.
-
Unraveled Floral Braids: Romantic braids purposely unraveled in some spots and adorned with flowers or accessories, with extensions for length.
-
Rope Twist Braids: An easy twist technique that ropes and weaves two sections together for twist braids, made fuller with extensions.
Summary
In summary, braiding short hair extensions is totally possible with the right techniques. Use small sections, fold the extensions properly, and secure the braids tightly. With some practice, you can rock all kinds of cute braided styles like fishtail braids, French braids, or braided updos - even with short hair! Just be gentle when removing the extensions to prevent damage. Invest in a quality hair extensions like Roxy Hair today and start your braiding ideas!
Frequently Asked Questions (FAQs)
Can you braid short extensions?
Yes, you can definitely braid short hair extensions!
How short is too short for braiding extensions?
There's no definitive length that's "too short" for braiding extensions, but generally, you'll want your extensions to be at least 6-8 inches long.
Do I need special short hair extensions for braiding?
Nope! You can use regular hair extensions for braiding, whether they're clip-ins, weaves, or weft pieces.
How do I keep short braided extensions from slipping out?
The key is using plenty of hairspray and small, firm hair ties to secure the braids.